 Like most projects on this blog, I am attempting something new. This one is no different. I decided that it was time to try and make a jointed teddy bear. I found a free pattern online at http://teddiesbylauralynn.com/free-patterns/. The pattern included detailed instructions and a list of materials along with the paper pattern. The pattern I used was called "Sebastian - a 9" Bear". The bear works out to be approximately 9 inches tall when standing up and is adorably cute! I do think that it wasn't the best pattern to use as a beginner teddy maker though as it is quite tricky to work with the small size. I used a sewing machine for most of the construction with the occasional bit of hand sewing to close up stuffing openings in seams and to shape some of the face. I also used a fleece fabric instead of mohair or fur fabric. I was unable to find any fur that wasn't really long (or really expensive). Below I have included my alterations to the instructions given on the website.
MATERIALS I USED:
- 1/4 metre of grey fleece fabric
- 5 joint disc sets 1" in diameter with screws, washers and bolts
- black beads for eyes
- black embroidery floss for nose and mouth
- green ribbon
METHOD I USED:
 1. I prepared the pattern pieces and pinned them to my fleece fabric making sure to match the straight grain of the fabric. As directed in the original instructions, I printed enough copies to have the right number of bear parts without having to re pin or double the fabric. I don't usually do this, but it truly made cutting easier with the fleece fabric! I cut out the pieces directly from the paper pattern without bothering to draw the pattern onto my fabric.
I sewed the nose section of the head by hand as recommended in the original instructions and the rest by machine. Once the main sections of the body are stitched up, I turned them right-side out.
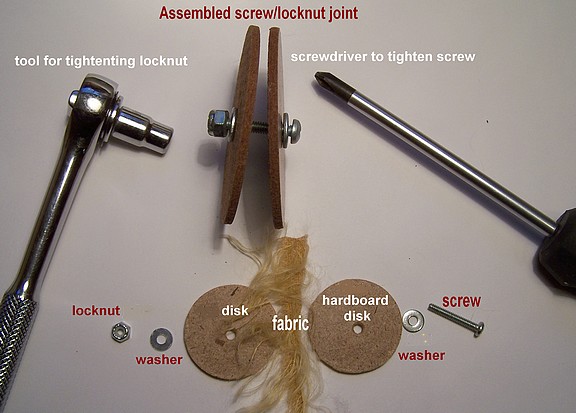 3. I began the stuffing process by stuffing the head. This needs to be packed very firmly with stuffing fibre to hold its shape. As the stuffing of the head nears completion, the joint needs to be placed inside the neck opening. The screw should stick out of the bears neck until it is attached to the body. Repeat the same process with the arms and legs, placing the disc and screw through as pre the instructions.
Once all the body parts (except the main body) were stuffed and jointed, I attached them to the body using the other half of the disc joints. This we the most difficult part of making the teddy as his body got very pull of screw and discs very quickly. Ideally, I should have left a larger opening in his back to work through. I ended up with the help of another person securing the bolt with pliers while I held the bear open and screwed on the locknut. Finally it all came together and I was able to stuff and close up the main body section.
4. The ears and face were next. The ears needed to be hand sewn in place with great care to hide not only the edges, but also the thread. I put the face together in a similar way to the original instructions with the exception of using bead for the eyes as I wasn't able to find any I was happy with. To finish my little bear off, I added a pale green ribbon around his neck.
Overall, I'm very happy with the result of this free pattern. Next time I attempt a jointed bear, I'll know better what I'm in for and will probably go for a larger size. Below are the finished pictures. Pretty cute!!


